

This post was made in conjunction with Tulip for the Tie Dye Your Summer Campaign.

When we travel, I like to crochet. It is such an easy take along craft. This summer, I am crocheting with t-shirt yarn. I'll show you how to make the yarn from a t-shirt, how to dye it, and how to crochet a small catch all basket. The basket is made from one large t-shirt and takes about an hour to crochet.
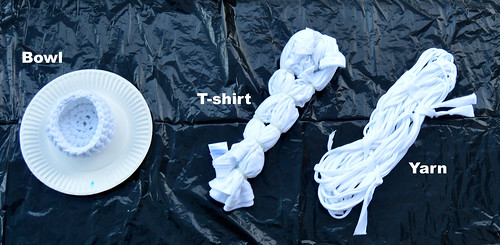
Supplies:
- Tulip Tie Dye Kit
- white t-shirts
- scissors
- crochet hook
- plastic bags
To cut the yarn:
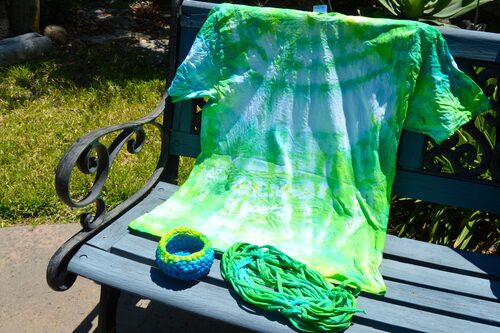
To Tie Dye:
I experimented with different ways to tie dye this project. The three ways include:
- dye the finished basket
- dye a t-shirt
- dye the yarn
I used three colors from the Tulip Ultimate Tie Dye Kit, blue, green and yellow. These three colors were applied to the three different t-shirt versions listed above.

Before dying:
After Dye is applied:

After the dye was used, I wrapped each example in a plastic grocery bag and allowed them to sit for six hours. Afterwards, I rinsed each in cold water until the water ran clear. The directions are included in the Tie Dye kit so you don't have to remember these steps. Tulip makes dying so easy to do.
After Dye is dry:
Crochet the basket:
The basket is worked in single crochet rounds that are joined with a slip stitch. Every round is started with one chain, which will be counted as one single crochet. (Single crochet = sc Stitch = st Slip stitch = sl st Chain = ch)
Ch 6. Join with sl st to first ch to form a ring.
Row1: Ch 1, crochet two sc to every st around. Join with sl st.
Row2: Ch 1, * 1 sc in next st, 2 sc in next st *, repeat from * to * around. Join with sl st.
Row3: Ch 1, * 1 sc in next two st, 2 sc in next st *, repeat from * to * around. Join with sl st.
You can continue these rows to your desired width of basket. You will just need to use more t-shirt yarn if you make a larger basket.
To raise the basket's sides, the next round you will work into just the outer yarn of the stitch. SC in each st around.
Then sc in each st around, adding rows till the edge is high enough. Cut the yarn, make a sl st and pull the end of the yarn through. Weave in all ends.
Finished Examples:
The first two were crocheted with a size 6 hook and the last one with a size 9 hook, just to show the variety. The size 9 hook was easier.
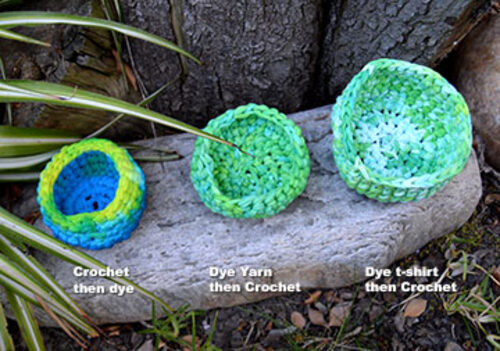
Which one do you like best? The basket that was made and then dyed? The t-shirt that was cut into yarn, dyed then crocheted? Or the t-shirt that was dyed, cut and finally crochet into a basket? It is interesting to see the differences in the end product when you change the process around. I loved working with the cotton t-shirt yarn during the summer because it wasn't a heavy weighted yarn nor was it too warm of a yarn while working with it. The t-shirt yarn was just perfect for summer weather crafting.
Facebook: http://facebook.com/lovetocreate
Twitter: http://twitter.com/ilovetocreate
Instagram: http://instagram.com/ilovetocreate
Pinterest: http://pinterest/ilovetocreate.com
Tumbler: http://tumblr.com/ilovetocreate
Google +: https://plus.google.com/+Ilovetocreate
YouTube: https://www.youtube.com/user/DuncanCrafts
You might also like:


