

This acorn necklace is the perfect accessory for your fall outfits. After creating the fiber acorns in this post [fiber acorns], I was looking at an acorn and the detail and color was well suited as one for a focal bead, and the idea was born. Let's turn this into a necklace.
Materials:
- Fiber acorn
- gold head pin
- glass bead
- dremel type drill (or hand drill)
- T-pin (if needed)
- Wire bending jewelry tools
- Brown cotton waxed cording - your desired length
- 6-12" of gold wire or brass
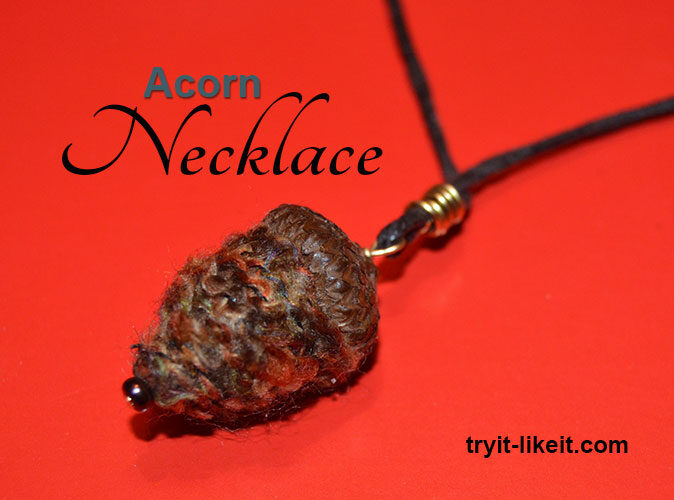
Since I had already made the fiber acorns, I was going to be drilling through them. If I were to start things over, I would have drilled the hole after baking but before wrapping the yarn. That way, if I messed up, I wouldn't be ruining an already wrapped acorn. Lucky for me, this wasn't the case and it worked out well. I slowly drilled from one end and then the other, my drill bit wasn't long enough to meet in the middle so this is where I used the T-pin to finish off the path. The inside of the acorn is softer than the outside (think nut meat) so I was able to push the pin through. This created the channel for the head pin, but it was a bit large and I feared the head pin would just slip right through. So, I added the glass bead onto the head pin before placing it through the acorn, problem solved.
At the top of the acorn I bent the head pin to create a loop that the cording would travel through. Once done, slide it onto the cording.
Match up the cords ends so the acorn rests in the exact middle of the cord. The acorn isn't really heavy enough on it's own to hang correctly and stay put. So, with the cords together, and above the loop of the acorn bead, I wrapped gold wire around the waxed cording to keep the acorn bead in place.
With this done, it is not time to finish off the necklace cording. I tied knots to make the length of the cord adjustable. And now it is ready to wear or gift.
How to tie an adjustable knot:


